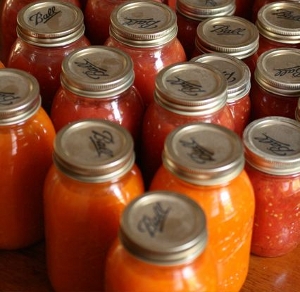
 There are several great reasons to can your own food, and if you want to save money, eat healthier, and cut down on food waste--you'll find out soon enough that canning can help you accomplish all that and more. Whether you're just now getting acquainted with the canning process and could use some helpful advice, or you're a canning pro in need of some gentle reminders, here are some useful tips to make your canning experiences more successful ones.
Select Fresh Produce
Since any fruits and vegetables that you're canning might be stored on your pantry shelf for an extended period of time, avoid selecting any produce that's overripe. Instead, opt for freshly picked fruits and veggies that aren't on the brink of expiring.
Sterilize Jars, Rings, and Lids
Never underestimate the importance of sterilizing jars, rings, and lids that you'll be using to can food. To properly sterilize jars, rings, and lids, wash them with soap and hot water and follow with a thorough rinse. Once washed and rinsed, use a tongs to place them in a large pot of boiling water, allowing them to sit in the hot bath for approximately five minutes. With the tongs, transfer the jars, rings, and lids to a clean layer of paper toweling and use immediately.
Always Use New Lids
While canning jars and rings can be used time and time again as long as they're in good condition, lids should not be reused. Always buy new lids each time you can food to ensure proper seals. If jars don't seal properly, you'll end up with spoiled food.
Picture Credit Life Hacker Saving Money
Use a Pressure Canner for Meats and Vegetables
Because they are low-acid foods, meat and most vegetable varieties must be canned in a pressure canner instead of in a boiling water bath. Although the boiling water bath reaches a temperature that's high enough to destroy dangerous bacteria, it can't prevent new spores from forming and thriving in low-acid foods after the boiling process is complete. A minimum temperature of 240 degrees Fahrenheit is required to preserve low-acid foods such as meat and vegetables--and the only way to achieve that kind of temperature is by using a pressure canner.
Use Recipes
If you're new to canning and need some guidance, use some tried and true recipes the first few times so that you don't have to wing it. Even if you have some experience under your belt when it comes to canning food, use new recipes once in while just to try something new.
Leave the Right Amount of Headspace
When filling a canning jar, be sure to leave the appropriate amount of headspace at the top of the jar for the type of food you're canning. For preserves such as jams and jellies, leave approximately 1/4" headspace. If you're canning acidic foods like tomatoes or fruit, 1/2" is the typical amount of space needed. Low-acid foods such as meats and vegetables need more headspace--anywhere from 1" to 1 1/4" is usually about right. If you're using a recipe to can, leave the amount of headspace that's recommended to ensure best results.
Wipe Jars and Rings Clean
After you've filled your jars with food, be sure to wipe up anything that may have dripped or spilled along jar openings. Not only will food residue prevent your jars from sealing, you risk rusting the metal rings, as well.
Set the Timer
It's essential that you set a timer once you place jars in a boiling water bath or a pressure canner so that you don't over-cook your canned goods. Set the timer according to the recipe you're using, or follow general guidelines for the type of food you're canning.
Label Canned Foods
Before you place your canned foods in your cupboard or pantry, label them. Each label should include the contents of the jar and the date it was canned. By labeling your jars, you'll know exactly what's in them and when they're due to expire.
Refrigerate Improperly Sealed Jars
There will be times when a lid will fail to seal properly to a jar, so check each and every one before storing them away. When you come across one that didn't seal properly, promptly place it in the refrigerator to be eaten first. By treating an unsealed jar as fresh food, you'll be able to enjoy your canned goods before they have a chance to go bad.
Canning your own food can be quite rewarding when done properly--so follow these helpful tips whenever you get the canning bug. The delicious, healthy food that you'll have lined up in your pantry for a rainy day will be well worth your efforts in the end.
Guest post from Jean Clark. Jean writes for BackgroundCheck.org.


I saw a tip on Katzkradul’s YouTube Channel a while back to use old socks to keep the jars from rattling against each other and breaking.